1. Description of PyQt5 library
PyQt is a set of Python bindings for the Qt application framework and runs on all platforms supported by Qt including Windows, OS X, Linux, iOS, and Android. PyQt is available under the GPL and commercial licenses. The GPL version is free of charge for open source projects, while the commercial version has a fee. PyQt is developed by Riverbank Computing, a UK-based company. PyQt allows you to create desktop applications with Python bindings for the Qt library. It is a popular choice for creating cross-platform GUI applications, and is often compared to Tkinter, which is the standard Python library for creating GUI applications. PyQt offers a more powerful set of widgets and is better suited for larger and more complex applications.
2. How to install PyQt5
PyQt5 can be installed using pip, the Python package installer. You can install it by running the following command in your command prompt or terminal:
# install PyQt5 library
pip install PyQt5
# install PyQt( tools
pip install pyqt5-tools- If you are using a version of Python earlier than 3.4, you may need to use pip3 instead of pip.
- In addition to the PyQt5 package, you will also need to install the Qt libraries and tools. The easiest way to do this is to download and install the official Qt installer for your operating system from the Qt website.
- Once you have the installer, you can run it and select the version of Qt and the components you want to install. Be sure to select the version that corresponds to the version of PyQt5 you have installed.
- If you are on Windows or Mac, the installer will also install a version of the Mingw or clang compiler, this is needed to build the C++ code of PyQt5.
Remark
Please note that on Windows, it's important that you use the same version of python and the same bitness (32 or 64bits) for PyQt5 and the Qt libraries. After installing the dependencies, you should be able to import and use the PyQt5 modules in your Python scripts.
3. List Of PyQt5 widgets
Here is a list of some commonly used widgets in PyQt5 with a brief description of their functionality:
- QLabel: Displays text or an image.
- QLineEdit: Allows the user to enter and edit a single line of text.
- QTextEdit: Allows the user to enter and edit multiple lines of text.
- QPushButton: A button that can be clicked to perform an action.
- QCheckBox: A checkbox that can be checked or unchecked.
- QRadioButton: A radio button that can be selected or deselected.
- QComboBox: A drop-down list that allows the user to select one item from a list.
- QListWidget: A list box that displays a list of items.
- QTreeWidget: A tree-like list box that displays items in a hierarchical structure.
- QTableWidget: A table that displays items in a grid.
- QProgressBar: A widget that displays the progress of a task.
- QSlider: A widget that allows the user to select a value by sliding a thumb along a track.
- QSpinBox: A widget that allows the user to select a value by clicking up and down arrows or typing a value into a text box.
- QDateEdit: A widget that allows the user to select a date.
- QTimeEdit: A widget that allows the user to select a time.
- QDateTimeEdit: A widget that allows the user to select a date and time.
- QGroupBox: A container widget that groups related widgets together.
- QTabWidget: A widget that allows the user to switch between multiple pages of widgets, each represented by a tab.
- QDialog: A dialog box that can be used to display information or ask the user for input.
- QMainWindow: A main window that can contain menus, toolbars, and a central widget.
- QGraphicsView: A widget that can display 2D graphics, such as images, shapes, and text.
- QStackedWidget: A widget that allows the user to switch between multiple pages of widgets, where only one widget is visible at a time.
- QToolBar: A toolbar that can contain buttons and other widgets, typically used to provide access to frequently used actions.
- QAction: A class that represents an action that can be added to menus, toolbars, or other widgets.
- QMenu: A widget that represents a menu, which can be added to a menu bar or other widget.
- QMenuBar: A widget that represents a menu bar, typically located at the top of a main window.
- QStatusBar: A widget that displays status information, typically located at the bottom of a main window.
- QSplitter: A widget that allows the user to resize multiple widgets by dragging a splitter handle.
- QMdiArea: A widget that allows the user to open multiple windows within a single parent window, similar to how multiple documents can be opened in an application like Microsoft Word.
- QFileDialog: A dialog box that allows the user to select a file or a directory.
These are just a few examples of the many widgets available in PyQt5, it's very rich in terms of widgets, you can find more information on the specific functionality and usage of each widget in the PyQt5 documentation.
4. First PyQt5 App
To create a graphics window in PyQt5, we must:
- Import the system module: sys
- Import the QApplication class that generates the application: QApplications from the PyQt5.QtWidgets package
- Import the QWidget class: from the PyQt5.QtWidgets package
- Create an application: using the instance method of the QApplication class
- Create a window: with the QWidget() method: win = QWidget ()
- View the window: using the show() method: win.show ()
- Run the application: using the exec_() method: app.exec_ ()
Here is an example of a simple PyQt5 application
Example
import sys
from PyQt5.QtWidgets import QApplication, QWidget

# create a PyQt5 application
app = QApplication(sys.argv)

# create a QWidget object
win = QWidget()

# Make a window title
win.setWindowTitle("This is a first PyQt5 app !")

# define a geometry of the window
win.setGeometry(100 , 100 , 500 , 400)

# apply the show method to view the window
win.show()

sys.exit(app.exec_())

Here is an other example of a basic PyQt5 application that creates a simple window with a "Quit" button:
Example
import sys
from PyQt5.QtWidgets import QApplication, QWidget, QPushButton
from PyQt5.QtCore import QCoreApplication

class MyApp(QWidget):

    def __init__(self):
        super().__init__()
        self.initUI()

    def initUI(self):
        quit_button = QPushButton('Quit', self)
        quit_button.clicked.connect(QCoreApplication.instance().quit)
        quit_button.resize(quit_button.sizeHint())
        quit_button.move(100, 50)

        self.setWindowTitle('My First PyQt5 App')
        self.setGeometry(300, 300, 300, 150)
        self.show()

if __name__ == '__main__':
    app = QApplication(sys.argv)
    ex = MyApp()
    sys.exit(app.exec_())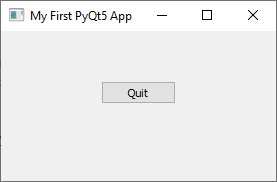
In this example:
- we first import the necessary modules from PyQt5.
- Then, we create a custom class called MyApp, which is based on the QWidget class.
- The MyApp class defines a constructor method (init) that sets up the user interface
- and finally an initUI method that creates the "Quit" button and sets the title and dimensions of the window.
- In the main program, we create an instance of the QApplication class, which manages the application's control flow and main settings.
- We also create an instance of our custom MyApp class and call its show() method to display the window.
- The exec_() method is called to start the event loop and execute the application.
- The sys.exit() function is called to ensure a clean exit when the application is closed.
This is a simple example, but it demonstrates the basic structure of a PyQt5 application and how to create a window with a button. you can find more information and examples in the PyQt5 documentation.
my-courses.net