We will see in this tutorial, how to deploy a django application on Heroku in step by step details. To start, you must:
- Download and install Git Bush on your machine:
- Download and install Heroku CLI on your machine:
1 - Installing Git on Windows
By default,
is installed on
and
computers as a command-line option. However, Microsoft Windows does not include a Git command. Below are the steps to install and use Git and GitHub on Microsoft Windows.
1 - Open the Git website.
2 - Click the Download link to download Git. The download should start automatically.
3 - Once downloaded, launch the installation from the browser or from the download folder.
4 - In the Window Select Components, leave all default options checked and check for other additional components you want to install.
5 - Next, in the Default Choice editor used by Git, unless you're familiar with Vim, we strongly recommend using a text editor you're familiar with. If Notepad++ is installed, we suggest using it as an editor.
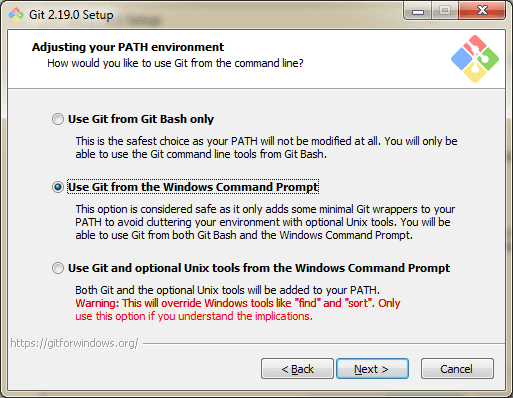
6 - Next, in the Adjust your PATH environment, we recommend that you keep Use Git by default in the Windows Command Prompt option selected, as shown below. This option will allow you to use Git from Git Bash or Windows Command Prompt.
7 - Then we recommend leaving the default selected under Use OpenSSH.
8 - Then, in Choice of HTTPS transport engine, leave the default value Use OpenSSL library selected.
9 - In Configure line ending conversions (Checkout Windows-style, commit Unix-style line endings), select the Checkout Windows-style, commit Unix-style line endings option unless you need other line endings for your work.
10 - In the Configure terminal emulator for use with Git Bash window, select Use MinTTY (the default terminal for MSYS2).
11 - Once done, you can check the Launch Git Bash option if you want to open a Bash command line or if you have selected the Windows command line running Git from the Windows command line.
Tip:
We strongly recommend using Git from the command line and not using a GUI. You will only use the Git interface command line to manage files. Editing can still be done through a text editor or IDE of your choice.
2 - Install Heroko CLI on your virtualenv
For
, just execute the following command:
brew tap heroku/brew && brew install herokuFor
, just execute the following command in the teminal shell:
sudo snap install --classic herokuTo install
on your
, download the application from the link: https://devcenter.heroku.com/articles/heroku-cli#download-and-installlaunch the app and follow the automated steps.
3 - Creating a new app in heroku
1 - Open your cmd command and navigate with cd to your directory project and activate virtual env
2 - Login to your heroku account by typing in your cmd:
heroku login3 - Create a new app in heroku by executing the command:
heroku create your_app_nameIf you want to see your app online you must just type in the cmd command:
heroku open --app your_app_nameadd your application to the allowed hosts in the settings.py file of your django project:
ALLOWED_HOSTS = ['your_app_name.herokuapp.com','127.0.0.1']4 - Installing gunicorn and creating a Procfile
To install gunicorn, just run the command:
pip install gunicornNow you can create Procfile with content:
web: gunicorn django_project.wsgiand save the Procfile in root directory of your project.
5 - Creating requirement file in the root directory
To notify django of your project's dependencies, please create a requirements.txt file by executing the command:
pip freeze > requirements.txt6 - Creating .gitignore file
You can find the content of .gitignore here: https://github.com/github/gitignore/blob/main/Python.gitignore
7 - Initializing a new git repository
To initialize a new git repository you must execute the command:
git init8 - Commit and Push repository to online app
Now add all files to git repository by executing the commande:
git add -AThen commit the selected files by executing the command:
git commit -m "Initial Commit"And finally push the files in your app online:
git push heroku masternow if everything is correct, your application will be accessible via the link: http://your_app_name.herokuapp.com
my-courses.net
Wow, excellent post. I'd like to draft like this too – taking time and extremely hard work to make a great article. Visit Alteryx certification sample questions. This post has inspired me to write some posts that I am going to write soon.