
1. About django model
In Django, a model is a Python class that represents a database table. It encapsulates the fields and behaviors of the data stored in the corresponding table. Models provide an abstraction layer for interacting with the database, allowing you to create, retrieve, update, and delete records.
A Django model class is defined in the models.py file of a Django app. Each attribute of the model class represents a field in the database table, specifying the type of data it can hold and additional properties such as maximum length, nullability, default values, and more.
By defining a django model, you can perform various operations on the associated database table, such as creating new records, querying existing records, updating data, and deleting records. Django's Object-Relational Mapping (ORM) system handles the translation between the model's Python code and the underlying database, making it easy to work with databases without writing SQL queries directly.
Models in Django also provide additional features such as automatic table creation, field validation, relationships between tables (One-to-One, One-to-Many, Many-to-Many), querying data using filters, and handling database transactions...
2. Fields type in django model
Django provides a variety of field types that you can use to define the different types of data in a Django model. Here are some commonly used field types:
- AutoField: An integer field that automatically increments for each new object added to the database. It is typically used as the primary key for a model.
- CharField: A field for storing character data, such as strings. You can specify the maximum length using the max_length parameter.
- IntegerField: A field for storing integers.
- FloatField: A field for storing floating-point numbers.
- BooleanField: A field for storing boolean values (True or False).
- DateField: A field for storing dates. It requires a date value in the format 'YYYY-MM-DD'.
- DateTimeField: A field for storing dates and times. It requires a datetime value in the format 'YYYY-MM-DD HH:MM:SS'.
- EmailField: A field for storing email addresses. It performs basic validation to ensure the value is a properly formatted email address.
- FileField: A field for uploading and storing files. It requires a file upload widget in the form.
- ImageField: A field for uploading and storing image files. It inherits from FileField but includes additional validation for image files.
- ForeignKey: A field used to define a many-to-one relationship between two models. It creates a foreign key in the database to establish the relationship.
- ManyToManyField: A field used to define a many-to-many relationship between two models. It creates an intermediate table in the database to manage the relationship.
- TextField: A field for storing large amounts of text data.
- URLField: A field for storing URLs. It performs basic validation to ensure the value is a properly formatted URL.
- UUIDField: A field for storing universally unique identifiers (UUIDs).
3. Creation of a Django model
In this paragraph we will create a django model called 'Student' with the fields: 'name', 'email', 'phone', and 'section'
To do this, you can follow these steps:
- Step 1: Create a django project called: 'mysite' and make migration
- step 2: Create an app called 'myapp'
- step 2: pen the file myapp/models.py in your Django app
- Step 3: Import the necessary modules:
from django.db import models
- Step 4: Define the 'Student' model with the desired fields:
class Student(models.Model):
    name = models.CharField(max_length=100)
    email = models.EmailField()
    phone = models.CharField(max_length=20)
    section = models.CharField(max_length=50)

    def __str__(self):
        return self.name
In this example:
- The 'Student' model: has four fields 'name', 'email', 'phone', and 'section'.
- The 'name' field: is defined as a CharField with a maximum length of 100 characters.
- The 'email' field: is an EmailField for storing email addresses.
- The 'phone' field: is a CharField with a maximum length of 20 characters.
- The 'section' field: is also a CharField with a maximum length of 50 characters.
- The __str__ method: is defined to return a human-readable string representation of a 'Student' object, which in this case is the name of the student.
Once you have defined the model, you can perform various database operations such as creating, retrieving, updating, and deleting 'Student' objects using Django's ORM. Remember to run migrations simply type in the command:
python manage.py makemigrations
and
python manage.py migrate
to create the corresponding database table for the 'Student' model.
4. Adding model in django admin area
In order to be able to manage the model that we have just created, it is therefore necessary to load it in the site's admin area. To do this, simply edit the myapp/admin.py file by adding the lines of code:
from django.contrib import admin
from .models import Student

# register the site in django admin area
admin.site.register(Student)
Now if you access the site's admin area, you will find the Student section, which gives you the possibility of editing and modification:

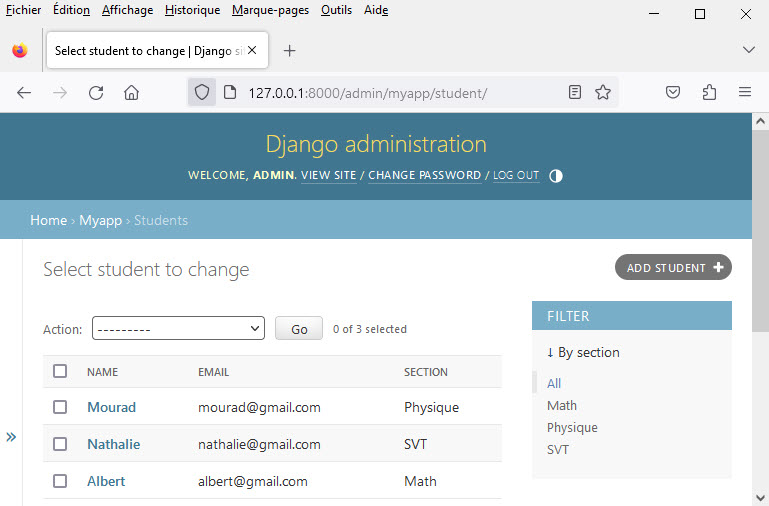
5. Improved model management within the admin area
We can now improve the display of records in the admin area by displaying the list of names, emails, sections … For this purpose we must import the admin module from django.contrib on the models.py file:
from django.contrib import admin
We then create a class in the models.py file which inherits from the admin.ModelAdmin class which allows to indicate the list of attributes to display and the attributes according to which the filtering of the records is performed:
class StudentAdmin(admin.ModelAdmin):
    list_display = ('name' , 'email' ,  'section')
    list_filter = ('name',)
Here is the final code of the models.py file:
from django.contrib import admin
from django.db import models
class Student(models.Model):
    name     = models.CharField(max_length=100)
    email    = models.EmailField()
    phone    = models.IntegerField(max_length=20)
    section  = models.CharField(max_length=50)

class StudentAdmin(admin.ModelAdmin):
    list_display = ('name' , 'email' ,  'section')
    list_filter = ('name',)
There are now some modifications to the level of the admin.py files in which we must import and save the StudentAdmin class that we just created:
from django.contrib import admin
from studentsApp.models import Student , StudentAdmin

admin.site.register(Student , StudentsAdmin)
And finally, if you access the admin area you will see that there is actually an improvement in the display of results showing the list of names, emails, sections …
By my-courses.net